
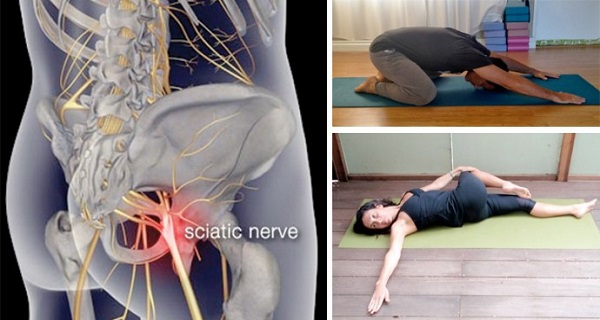
We have about a 40% chance of experiencing some sciatica pain during our lives. The sciatic nerve is the longest nerve in our body, running from the base of the spine right down through the thigh and calf muscles, all the way to the foot. Signs of sciatica can be as simple as a tingling or numbness anywhere in your buttocks, legs or feet, or it can manifest as severe pain in those areas.
Sciatica can also cause unexpected weakness in the legs, reduced reflexes in your achilles tendon and knee, and reduced flexibility in your ankles. Perhaps the most common is a pinching sensation in the butt or legs as you walk. Fortunately, there are some yoga stretches which can significantly ease the discomfort of sciatica. We’ve selected nine of the simplest poses that even yoga novices will be able to master.
1) Standing back twist.
The versatility of this pose makes it one of the most useful. You can take a quick break from your desk at work to do it – all you need is a chair or something else to elevate your foot. Make sure you turn in the direction of your raised leg.
2) Knee raise.
Lie on your back and bring one knee up to your chest while keeping the other leg straight on the floor. Try to press your raised leg to your chest as firmly as you can, and hold the position for at least thirty seconds. Make sure your shoulders are flat on the floor.
3) Reclining big toe pose.
An elastic strap is ideal for this one but you can also use a thin towel, or a belt from a robe. Place it around the ball of your foot and straighten that same leg up towards the ceiling. Keep your toes flexed back towards you – don’t point your toes – and keep your buttocks firmly on the floor. Note that you might find it hard to keep your leg fully extended and that’s okay – keep it as straight as you can, and your flexibility will improve over time. When you lower your leg, bend at the knee first, lower it to your chest, and then straighten your leg to the floor. It’s easier on your back that way.
4) The single leg twist.
Lie on your back and drape one knee over the other leg, which you should hold straight. Place your closest hand on the bent knee and then turn your upper body to face in the opposite direction.
5) Upright king pigeon pose.
This is a more basic variation of the king pigeon pose which can be performed anywhere, using a table or another hip-height surface. Place your right leg up on the table and lean forward. Now try to shuffle back with your foot on the ground – this will make the stretch more intense. You can experiment the stretch of the hip by leaning forward over your bent leg, and standing up straight.
6) Simple seated twist.
Sit on the floor. Fold one leg over the other, and then draw the other leg back so that the heel of your foot meets your buttocks. Once you’re comfortable in this pose, you can begin the stretch by rotating your body to look in the direction of your top leg. (i.e. If your left leg is on top, as in the picture, you’ll turn your torso to the left.) Hold your top leg to keep the stretch taut, and try to maintain a straight back. breathe deeply, and use your inhalation to lift and lengthen, then use your exhalation to twist.
7) Staff pose.
Although basic, this is a very effective pose when performed properly. Sit on the floor with your legs outstretched and your palms flat on the ground beside you. Flex your toes back towards your body while keeping your heels planted and your legs straight. Imagine you are being pulled upwards by a string connected to your head – this will elongate your spine. Try to hold the pose for some time – you’ll be surprised at how it stretches your hamstrings.
8) Standing hamstring stretches.
This is another good pose for stretching the hamstring. Try to have your raised leg at hip height or below, and keep your hips facing forward (if you have tight hamstrings the tendency will be to turn outwards). Keep your toes pointing upwards. For a harder stretch, bend forwards over your knee, keeping your back and leg perfectly straight. It is important that your hip opening stays down, so if you need to, you can loop a belt around your raised thigh and your other foot.
9) Child’s pose.
We’ll finish off with an easy one: position yourself on your knees, drape yourself forward and gently stretch your arms out ahead of you. This is a fantastic pose to do at the end of every day as it stretches out your back and arms. Just try not to fall asleep…
Sciatica can be painful, especially when you suffer from it over long periods of time. Try some of these simple yoga poses every day for relief. It is best to hold all of these poses for ten breaths, or thirty seconds, and to repeat the exercises on the opposite side of your body. Even if you repeat each set twice you’ll still only need about sixteen minutes to complete all of them. If you feel any pain (other than the normal tightness of a stretch), you should seek professional help. Otherwise, proceed gently and you’ll find that yoga has a whole host of benefits for your wellbeing.